Showing posts with label Tutorial. Show all posts

Crochet Birdies

These adorable little crochet Bridie's are being shared by non other then Lucy over at the very cheerful and colorful blog, Attic 24. Lucy lives in England and if she's not sharing pics from her walks around the country side or her Attic window "which she frequents often for quite moments of crochet bliss" you will find her sharing not only what she crochets but Tutorials on how two's and her amazing choice of yarn in the most amazing colors.....

Lucy's just sweet that way. Whats hers is yours! When she found these sweet little birdies eating out of her hand she wanted to make sure they would eat out of ours also!


Wouldn't this one look precious on a Christmas tree or on top of a wrapped present?


Well, not wasting another moment lets crochet. Lucy wrote the directions in two parts.

1. click here for the flat circle , this is how to make the main body of the Birdie

2. click here for the Birdie Decorations. This is how to make all the other bits needed for this cute little Crochet Bird.


A little note from Lucy's blog that I thought would be helpful:

I felt that the Flat Circle pattern needed to be listed as a page on it's own as it's a very useful pattern to know (can also be used to make a round cushion, or the bottom of a bag). I've had lots of emails lately asking for help in trouble shooting the bottoms-of-bags which are not working out as they should, and I'm hoping that these detailed instructions and many, many pictures should help you to make a flat circle easily, or trouble shoot bag bottoms that have gone baggy or curly!!

You can find Lucy's adorable bag pattern also, on her site! Well, I think I will quit rambling on so you can get on over and visit her site...if you stop by do tell her I sent you...and don't forget to put out some bird seed.....:)


Crochet Baby Cot Blanket Pattern

Hello to all....I have just finished crocheting a Baby Blanket for the Knit-a-Square Foundation. I remembered to take a picture of the blanket before I sent if off, so I would be able to post my how to pattern along with it. Well, here it is......


I used Lion brand Yarn. Vanna's Choice Baby. 100% Acrylic. Medium (4)


- 2 rolls of Lamb
- 1 roll of Aqua
- 1 roll of Mint


Makes

-16-6"x 6" squares, 4 rows of 4 squares


Pattern:

Chain 16, turn, *single crochet across * 18 rows = 1-6"x 6" square.

When you have finished all 16 squares then you slip stitch them together.

Edge:

Slip Stitch all around edge of blanket.

In next row (*3 single crochet, Chain 3, 1 single crochet into last single crochet made.) * cont. till last stitch. Finish off.

Finish Size is 23" x 23".

Well there you have it..:) If you ladies have any questions, please feel free to ask ! I would love to hear from you.....Hugs Lisa

French Knots......


Wow, it has been a week since I posted! I have been busy working on some new items......This project is going to be a linen pillow for my bedroom. I'v used one of my vintage linen's and some ABC stencils. I traced the letters onto the linen very lightly and have started to fill the letters in with French Knots.....it will read SPRING. Here is a very helpful tutorial on how to make French Knots......Primrose designs.blogspot.com You will locate it on the right hand side of her blog under Stitch School.

Later this week I will be posting these fun Spring necklace scarfs in my Etsy shop and some Beary Goodness!
As for now I'm going to go outside and enjoy this wonderful Spring weather! Hope everyone is having a lovely weekend with family and friends!These two are.....:)

Holiday Spice Pomander Tutorial

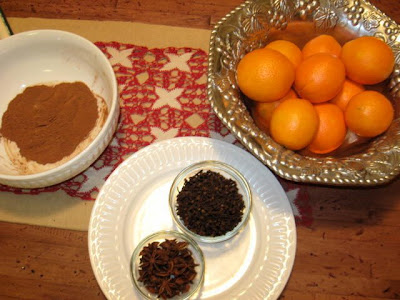
This is my first Tutorial, so here we go.....if you look closely at the picture below, you will see a glass tier decoration of orange pomanders. We are going to be making orange spice Pomanders. I so enjoy these because they last such a long time and fill the air with a lovely fragrance.To start with you will need one perfect orange, one ounce whole cloves, one tablespoon cinnamon, one teaspoon nutmeg, one teaspoon allspice, one star of anise, a skewer and an 18 inch length of ribbon.

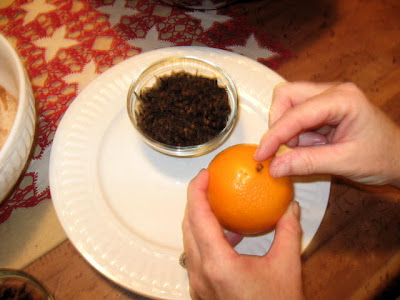
Push the stem ends of the cloves into the orange-just close enough to touch.You can make a decoration with the cloves or cover the orange completely with the cloves which is what I like to do.....
When you are done decorating your orange with the cloves you will put the orange in a bowl with the mixture of cinnamon, nutmeg and allspice. Roll the orange pomander in the spice mixture. Leave the pomander in the bowl in a warm spot for two weeks are longer if you prefer. Roll it in the spices occasionally to help the orange dry, harden, and shrink. " If you do not have a warm sunny window" you can use a heat lamp making sure that you do not leave the heat lamp on, unless you are home and can watch over it.
When this has been done, you then take the ribbon and with a skewer pierce the pomander orange lengthwise threw the middle and thread a double length of ribbon through the top of the pomander. Tie a knot and a bow at the bottom and leave a loop for hanging at the top. I then glue the star of anise on top of the bow. If you do not want to hang it you can just let it sit in a pretty dish.
I like to give these as a Holiday Hostess gift. I put them in a pretty clear bag, then add some of the extra star of anise then the orange pomander, wrap it up with a cute tag and bow.

I also like to take the Hostess our favorite cider and spice drink from R.W. Knudsen. It is simply the best.....

Well, I hope this was easy to understand. If you have any questions please e-mail me, I will answer them as best as I can. Hope you have fun making Pomanders.......Hugs :) Lisa

Great Gift Ideas for Crafters

Wow, I clicked on over to make my weekly visit to the purl bee..... Well, OK, it really is more like 2 or 3 times a week and you will soon see why! She had listed such wonderful Christmas gift ideas for any family member or friend who loves to sew, craft , knit, etc.


Here is her idea for the embroiderer,
Or for a crafty kid....Wow, I would love to have those threads just sitting in my sewing room for cheerfulness!!
Here's one for a new seamstress,
Or the color lover who knits or crochets......
Maybe just some stocking stuffers.....
And, she has many more ideas that she list on her post plus, she tells you all about them and how to get them. I can't get her blog to show up in this post, BUT, I have her on my side bar under crafty ladies. Just click on Purl Bee and I hope you find something fun, I did! Now I just have too drop back by and shop for some presents.....O, my :)

A little something for Mr. Brown

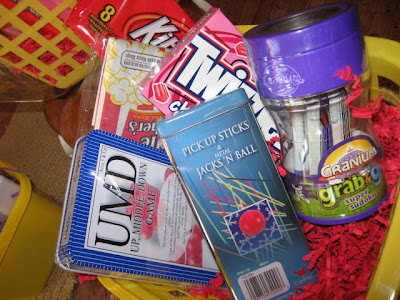
Once a year my dear husband ask me to do a favor for one of his business clients. They have a BBQ for their clients and family members and they ask if I would make baskets that they can raffle off.So I go to a Store called Tuesday Mornings and I buy Baskets and all kinds of items to pamper the lady's with.
Then I make baskets for the whole family to enjoy together. Tuesday Mornings always has these old vintage toys, which I think are the best! I add some candy and popcorn then wrap it up pretty........

and this is what they look like......... Then off they go........My husband is happy and I get such a big Thank you from his client! I love the idea of these baskets because some cater to the women and the others are filled with fun for the whole family, so the kids leave the BBQ excited about the raffle also......:)

Ladies, Ladies, Ladies,

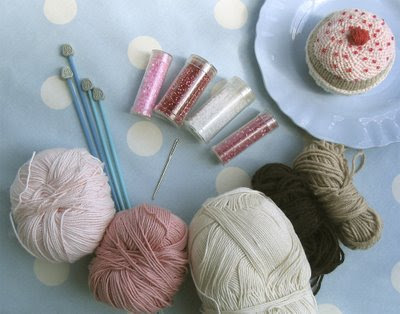
O, you girls give me to much credit...lol....I really DID NOT Knit those sweet cupcakes!!! The lovely Julie, of Little Cotton Rabbits.....Knitted them! WHEN I do learn to knit and I hope it will be real soon, cuz.... "I'm working on it" I will post my cupcakes and then we will see what they look like. As for now, I did crochet these cupcakes for my daughters Bridal Shower......and I do have the pattern to share if anyone is interested.....:) Hugs, Lisa

Eye Candy......

I have been wanting to Knit these cupcakes for such a long time, mind you, I don't know how to Knit. But I find them to be Soooooo Pretty and Cute!!!!!!! And, I think it would be so much fun to make these for gifts. Well, I must not be the only one with this desire because Julie over at "Little Cotton Rabbits" has now began selling her cupcake pattern and you can purchased it from her Etsy Shop. Which of course I did, mind you, I don't know how to knit, lol.

Well, once you order the pattern and pay for it, Julie will send the pattern too you via your e-mail address. There are no shipping fees and you have instance joy!!! The pattern is easy to understand and tells you all the items you will need and the brand labels.
So, if you have never stopped by her sweet site.....you might want to drop by and check out all of her lovely knitted animals . and if you do not know how to knit....like me......This one says she can help you learn real fast....:0... wink....


*pictures are from the home of Little Cotton Rabbits, do hop by.......Hugs..lisa

KNITTING IN JAPANESE


Well this week the trend in posting is all about Japanese craft books and how to understand them. I recently purchased this craft book from Sophie over at ChirocolMonster.Etsy.com. A great shop to buy Japanese books from. Sophie shared some helpful information with me on some sites to help understand knitting in Japanese. Check out clearwaterknits.com/charting/lesson1.html and Needleartsbookshop.com/Japanese_Knitting_Books.html. Look for the free - Interpreting Japanese Knitting Patterns by Marsha White" in the web page. the pdf document explains every detail on how to read Japanese patterns.
For more fun information on understanding Japanese craft books, you can also check out Mylittlemochi.typepad.com once there, look under Japanese Craft Book help. There you will find some great information on stuffed animals, crochet and so on......Enjoy!!

SpringTote Pattern

I just found this cute pattern to make a VERY simple Spring tote! Click here to check out the pattern and if you decide to whip one up be sure to check back with us so we can visit your site and see your Spring creation!!!
Blog Widget by LinkWithin